1. When starting off, it’s a good idea to get the Healing Brush Tool and fix some of the small blemishes and wrinkles. Simply select the tool, Alt + click on an area to select a source point, and then click onto the areas you want to clone/heal.
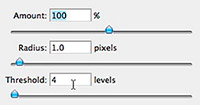 2. Before we soften the skin, we’ll actually apply a medium level of sharpening to get the most realistic results. With your image selected, go to Filter > Sharpen > Unsharp Mask and set the Amount to 100%, Radius to 1px, and Threshold to somewhere between 4-6.
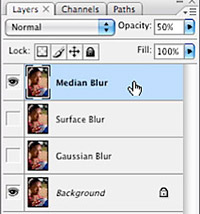 3. Duplicate your image three times (press Ctrl/Cmd + J three times). Name the layers “Gaussian Blur”, “Surface Blur”, and “Median Blur” respectively, then hide the latter two layers so that only the “Gaussian Blur” layer and your original image are visible.
 4. With the “Gaussian Blur” layer selected, go to Filter > Blur > Gaussian blur and choose a setting somwhere between 15-20px. You’re looking to blur out most of the detail in the skin, but retain a hint of some of the larger features, such as the eyes, nose, and mouth. Hit OK to apply the gaussian blur to the layer, drop the layer’s opacity to 50% and then hide the layer.
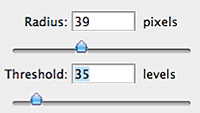 5. Select your “Surface Blur” layer, make sure it’s visible and then go to Filter > Blur > Surface Blur. Your settings for both sliders will need to be somewhere between 25-40. The concept here is the same as with the gaussian blur in that you want to smooth out most of the detail to make sure you have smooth transitions between shadows and highlights. Apply the surface blur to the layer, drop the layer’s opacity to 50%, then hide the layer.
 6. Select the “Median Blur” layer and toggle on its visibility. Go to Filter > Noise > Median… and move the slider to somewhere between 20-25 pixels. Keep in mind the same concept as with the two previous layers in that you only want to blur out most of the detail and retain smooth skin tones and transitions. Apply the median blur and drop the layer’s opacity to 50%.
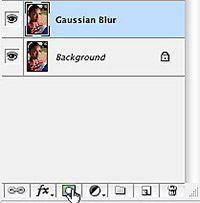 7. At this point, select your “Gaussian Blur” layer and toggle on its visibility so that only it and your original image are visible. Hold down your Alt/Option key and click on the Add Layer Mask icon at the bottom of the layers palette to add a black layer mask. Grab the Brush Tool, set your foreground color to white, and start painting over the skin of your subject. Avoid areas of detail, such as the eyes, eyebrows, nose, mouth, strong creases and wrinkles, etc. You only want to paint over the open areas of skin.
In the video, I only worked on the face of the subject, but I urge you to apply this softening to any areas of skin that are visible. The reason being that the retouched areas of skin will look obviously altered against the areas of untouched skin. To keep a sense of realism to your photo, it’s recommended that you go ahead and include all of the skin in your retouches.
Be sure to check the progress of your layer mask by Alt/Option clicking on the layer mask icon to view only the mask. This will show you the areas where you may have missed some spots. Simply Alt/Option click on the layer mask icon again to return to normal view.
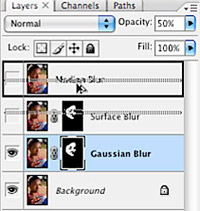 8. Once your layer mask is complete, you can copy it to your other layers. To do this, simply hold down the Alt/Option key, click and hold on the layer mask in your “Gaussian Blur” layer and drag it straight up to the “Surface Blur” layer. Repeat this step to add the layer mask to the “Median Blur” layer as well.
This is the point where most people stop, but we’ll be doing one more quick technique to add back in some of the detail and texture of the skin.
 9. Alt/Option click on one of the layer mask icons to load the masked area as a selection. Select your original image and Ctrl/Cmd + J to jump the selected area to a new layer. Drag that layer to the top of the layer stack. Desaturate this layer by going to Image > Adjustments > Desaturate.
 10. With this layer still selected, go to Filter > Other > High Pass… The easiest way to work with this filter is to drag the slider all the way to the left and slowly bring it to the right. Keep an eye on the highlights as they start coming back into the layer. You’ll want to end up between 10-25px, just so some of the highlights are starting to peek back through. Hit OK to apply the filter.
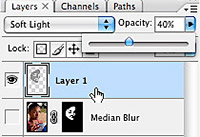 11. Change the blend mode of this layer to Soft Light and drop the opacity to around 25-50%, depending on how much detail you want to add back to your photo. Leave this layer at the top of the layer stack as it will be a detail overlay for the underlying softening layers.
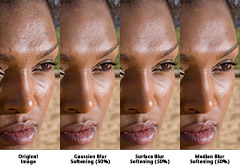
At this point, you have three of the most popular skin softening techniques on separate layers. Now you can easily toggle the visibility of each layer to compare the different methods of skin smoothing. This is a great way to not only find a great look for your photo, but to get a little more hands-on experience with the different levels of softening and smoothing available in Photoshop.
Once you’ve found the skin softening technique that you like the most, you can raise or lower the opacity of the layer to make the effect more or less dramatic. For optimum realism, take the opacity to around 35-40%. To achieve the once-popular porcelain skin appearance, simply raise the opacity of your softening layer to 85-90% and hide the top layer that we created in steps 9-11.
Click below for a quick comparison overview of each softening technique against the original image.


0 komentar:
Post a Comment