In this tutorial I will show you how to create a nice light painiting effect for texts and logos. You will be able to design nice wallpapers and images using this technique and even different light effects. Also, celebrating the Olympic Games we will use its logo for the example.
Step 1
Open a new document and Photoshop, unlock the background layer and apply a Layer Style to it. Use Gradient Overlay, for the colors use Black and a dark red (#1d0c0c). Use Radial for the style and Normal for the Blend Mode.

Step 2
Create a new layer and go to Filter>Render>Clouds. Make sure you have black and white for the background and foreground colors. Change the Blend Mode to Color Dodge.
The Gradient Overlay and this cloud layer is necessary to increase the light effect. As we will use color dodge to create the effect, it's necessary to have some areas lighter than the others. Otherwise the color dodge wouldn't work.

Step 3
With the Rectangular Marquee Tool (M), create a rectangluar selection at the bottom, there will be the floor of the image. The copy and paste that. Change again the Blend mode to Color Dodge and go to Edit>Transform>Distort. You can apply a perspective or scale just the height of the image.

Step 4
Here I used a photo from iStockphoto, you can buy it here. Select the Pen Tool(P) or the Magnetic Lasso Tool (L) and extract the guy from the photo.

Step 5
With the "dude" layer select go to Image>Ajustments>Brightness/Contrast and change a bit of the values. Use the image below for the exactly values for Brightness and Contrast.

Step 6
Let's change the Hue and Saturation, go to Image>Adjustments>Hue/Saturation. Again use the image below for the correct values.

Step 7
Create a new layer on top of the "dude" layer. Go to Layer>Create Clipping Mask, after that, select the Brush Tool (B), for the color use a red (#f22625) and paint over the guy. Change the blend mode to Multiply.

Step 8
Select the Eraser Tool (E) and delete some parts of the red layer. The idea is just make the highlights more red.

Step 9
Let's create the dude's shadow. To do that is really easy. Create a markee selection from the "dude" layer, create a new layer and fill it with black. Then just go to Edit>Transform>Distort. Following the illumination of the photo you can have an idea of where to distort the shadow.

Step 10
Go to Filter>Blur>Gaussian Blur and add a little of blur to the shadow, 1.5 pixels for the Radius will be enough. Then just change the Blend Mode to Multiply.

Step 11 (Light Painting)
The light effect is the easiest part I think. I've shown you this effect quite a few times so I think it won't be a problem.
Create a new folder and rename it to "Lights". Inside this folder Paste the Beijing 2008 logo. You can get it from Google Images. Probably the text will be black, but that won't be a problem, just go to Image>Adjustments>Invert. We will need all the text and all symbols in white.

Step 12
With the Beijing 2008 layer select just go to Filter>Blur>Gaussian Blur. Use 3.5 pixels for the Radius.

Step 13
For the emblem, the 5 rings. Repeat the same thing as the previous step. However if you want to make it even better, and that can apply to the others too, duplicate the layer so you will have 2 layers of the same symbol. In one apply the gaussian blur with a big radius and the other, the one on top apply the gaussian blur with a very small value like 1-1.5 pixels.

Step 14
Repeat the same thing for the other symbol. The tip here is change different Gaussian Blur values.

Step 15
Create a marquee selection from de "dude" layer again, exactly as we did in the step 9. The go to Select>Modify>Expand. Expand 3 pixels and create a new layer, inside the Lights folder. Fill the layer with white and go to Filter>Blur>Gaussian Blur. Use 3 pixels for the Radius. After that select the Eraser Tool (E) and start deleting the glow (1-4). Use a big brush very soft, 0% hardness. Just leave the top left part of the layer, exactly the parts closer to the light effect.

Conclusion
You can add more details like the sparks or different gradient colors. Just keep in mind that the color dodge will work with darker colors but now with black, and if the colors are too light the effect won't work either. Try different colors to see how they behave with the lights I'm sure you will understand.
I hope you liked the effect and enjoy the Olympic Games.
 Click on the image to see a full preview
Another Example
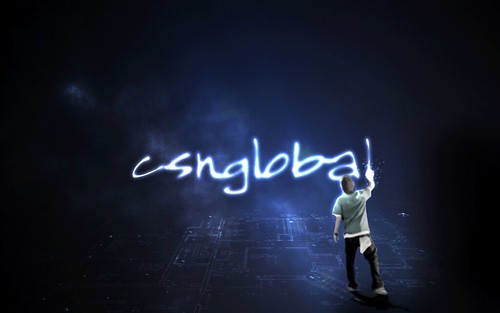
Read More......


