I got a very interesting question on my previous tutorial (How to create vector photoshop brushes). A blogger mate was having a problem to organize long collection lists of brush set. I will never been dealing with such problem if I haven’t got this comment posted. So, I would say thank you anonymous mate! Below there is a screen shot showing how these lists get you dizzy because they are all appear together and arranged in alphabetical order, but sometimes you don’t have to use the major numbers of them.
click to enlarge!
If you are a graphic designer and using photoshop brush set a lot, being practical in everyway to finish your job is foremost. I would have to say that you need to be tidying up your photoshop brushes set list, since on the internet most of them are categorized and designed in different style or theme. For example, there are thousand kinds brushes set, such as Foliage, Grunge, Architectural and many more. Should this tutorial, will help you more?…. Just try it ;) and gimme comment if I may get missed out something ok.
Okay…. Let’s see, how this thing works.
Step 1 – Installing new photoshop brush set
Actually there is an easy way to install photoshop brush set in your workspace as you can read it in my previous tutorial. Well that kind of way would rather have limited options if your main concern is to tidy up your long list of brush set.
See how you can save your time by installing all your brush set to your system operation folders (I’m a Windows user), then creating different kinds of Menu Customization Set to group your photoshop brushes set based on their style and theme.
Firstly, all you have to do is to move your photoshop brushes set collection to this system root folder, as you seen below. I don’t know how it looks in Mac, but I am sure it would works pretty similar.
click to enlarge!
Step 2 – Menus Customization
Go to the menu Edit > Keyboard Shortcuts and Menus (Alt + Shift+ Ctrl +K) and click the Menus tab, then on the Pallete Menus Option Box, Find Brushes option. 
Set the Menu For: Pallete Menus then you will see another sub option box like this:
All of your photoshop brush that you have moved into the system folder is now appeared in this customization box. Each of them is now signed as Palette Menu Command.
From this stage, you can start to group your photoshop brush set based on their design style or theme. Turn off the visibility of other type of brushes set that you think would not related to the group of style that you are about to create.
You can also add up highlight to your photoshop brush just like what is shown above with a color.
Step 3 – Keyboard Shortcut Customization
Go back again to the menu Edit > Keyboard Shortcuts and Menus (Alt + Shift+ Ctrl +K) and click the Keyboard Shortcuts tab, then on the Pallete Menus Option Box, Find Brushes option.
Set the Shortcuts For: Pallete Menus then you will see another sub option box like this: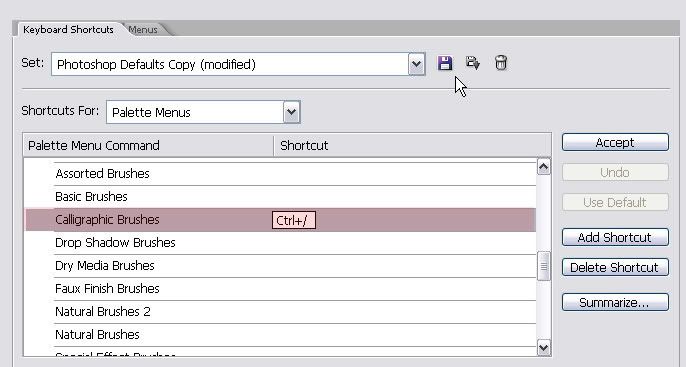
click to enlarge!
To assign a shortcut for a brush set, click the right side of the row lists, and then fill the blank box with available shortcut as you wish. Click the Accept button if you already sure with the choice of shortcut available. You can assign more than one shortcut by clicking the Add Shortcut button, and fill in with alternatives of available shortcut. Removing the shortcut would be simply done by clicking the Delete Shortcut.
Summarize button will allow you to save all the lists of this set in a web page format for further use.
Step 4 – Saving the Shortcut and Menus Customization settings
If you think that you already have the group list complete, save this Menus Customization set, and name it with according to the group design style or theme.
The settings will be saved in .MNU file format, and you can re-customize it whenever you want by repeating what has been explained in the initial steps. Creating new Menu Customization to group some photoshop brushes in one file is a great idea because whenever you need certain design style of brush set, you just need to activate one of the Menus Customization set in the list.
NOTE:
Before the new Menu Customization set is made, you will always working this customization on Photoshop Default Menus. Make sure that you start it back all over again from Photoshop Default Menus on the “Set” drop down menus if you want to create another group of Menu Customization
Check the list on your Brush window by entering menu Window > Brushes (F5).
Click the tiny arrow on the right top to show the tray menu commands, and you will find your brush set menus customization listed.
click to enlarge!
Tidying up Your Photoshop Brush Set in Menus Customization
Tips | Sunday, August 10, 2008
This entry was posted on 5:57 PM
and is filed under
Tips
.
You can follow any responses to this entry through
the RSS 2.0 feed.
You can leave a response,
or trackback from your own site.
Subscribe to:
Post Comments (Atom)


0 komentar:
Post a Comment