I got a very interesting question on my previous tutorial (How to create vector photoshop brushes). A blogger mate was having a problem to organize long collection lists of brush set. I will never been dealing with such problem if I haven’t got this comment posted. So, I would say thank you anonymous mate! Below there is a screen shot showing how these lists get you dizzy because they are all appear together and arranged in alphabetical order, but sometimes you don’t have to use the major numbers of them.
click to enlarge!
If you are a graphic designer and using photoshop brush set a lot, being practical in everyway to finish your job is foremost. I would have to say that you need to be tidying up your photoshop brushes set list, since on the internet most of them are categorized and designed in different style or theme. For example, there are thousand kinds brushes set, such as Foliage, Grunge, Architectural and many more. Should this tutorial, will help you more?…. Just try it ;) and gimme comment if I may get missed out something ok.
Okay…. Let’s see, how this thing works.
Step 1 – Installing new photoshop brush set
Actually there is an easy way to install photoshop brush set in your workspace as you can read it in my previous tutorial. Well that kind of way would rather have limited options if your main concern is to tidy up your long list of brush set.
See how you can save your time by installing all your brush set to your system operation folders (I’m a Windows user), then creating different kinds of Menu Customization Set to group your photoshop brushes set based on their style and theme.
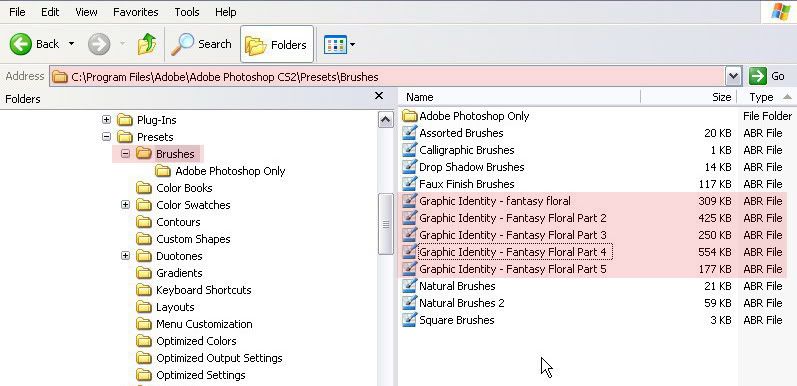
Firstly, all you have to do is to move your photoshop brushes set collection to this system root folder, as you seen below. I don’t know how it looks in Mac, but I am sure it would works pretty similar.
click to enlarge!
Step 2 – Menus Customization
Go to the menu Edit > Keyboard Shortcuts and Menus (Alt + Shift+ Ctrl +K) and click the Menus tab, then on the Pallete Menus Option Box, Find Brushes option.
Set the Menu For: Pallete Menus then you will see another sub option box like this:
All of your photoshop brush that you have moved into the system folder is now appeared in this customization box. Each of them is now signed as Palette Menu Command.
From this stage, you can start to group your photoshop brush set based on their design style or theme. Turn off the visibility of other type of brushes set that you think would not related to the group of style that you are about to create.
You can also add up highlight to your photoshop brush just like what is shown above with a color.
Step 3 – Keyboard Shortcut Customization
Go back again to the menu Edit > Keyboard Shortcuts and Menus (Alt + Shift+ Ctrl +K) and click the Keyboard Shortcuts tab, then on the Pallete Menus Option Box, Find Brushes option.
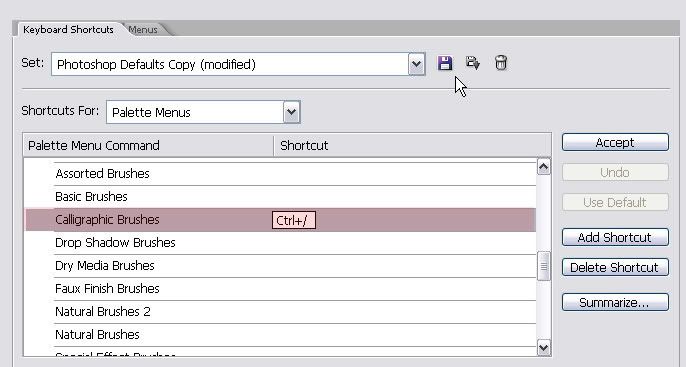
Set the Shortcuts For: Pallete Menus then you will see another sub option box like this:
click to enlarge!
To assign a shortcut for a brush set, click the right side of the row lists, and then fill the blank box with available shortcut as you wish. Click the Accept button if you already sure with the choice of shortcut available. You can assign more than one shortcut by clicking the Add Shortcut button, and fill in with alternatives of available shortcut. Removing the shortcut would be simply done by clicking the Delete Shortcut.
Summarize button will allow you to save all the lists of this set in a web page format for further use.
Step 4 – Saving the Shortcut and Menus Customization settings
If you think that you already have the group list complete, save this Menus Customization set, and name it with according to the group design style or theme.
The settings will be saved in .MNU file format, and you can re-customize it whenever you want by repeating what has been explained in the initial steps. Creating new Menu Customization to group some photoshop brushes in one file is a great idea because whenever you need certain design style of brush set, you just need to activate one of the Menus Customization set in the list.
NOTE:
Before the new Menu Customization set is made, you will always working this customization on Photoshop Default Menus. Make sure that you start it back all over again from Photoshop Default Menus on the “Set” drop down menus if you want to create another group of Menu Customization
Check the list on your Brush window by entering menu Window > Brushes (F5).
Click the tiny arrow on the right top to show the tray menu commands, and you will find your brush set menus customization listed.
click to enlarge!
Tidying up Your Photoshop Brush Set in Menus Customization
Tips | Sunday, August 10, 2008





Anti-Aliasing
Tips | Saturday, August 9, 2008
Use these techniques when you've drawn an un-antialiased mask and you want it to be smooth.
Here is an example of what this tutorial can do for you:

Notice the jagged edge around the "Normal Burger". Using this photoshop tutorial I created a tasty burger in seconds.
You may ask yourself, "Why is phong doing this? My photoshop burgers are already tasty!" Well, you never know when this technique will come in handy, so continue.
Step 1
Create a new image 500x500 pixels with a white background.
 Grab the Marquee Circle Selection tool, and in the options window de-select anti-aliasing.
On a new layer, fill the selection with the forground color. (Alt+Backspace) Deselect (Ctrl+D)
TimeOut
Observe the jagged ugly edges of the circle. Pretend the fact that it is jagged is something you had no control over. That is when you would ACTUALLY use this tutorial.
 In the Channels window, create a new channel. Fill the selection with white. Deselect (Ctrl+D).
Step 2
 In the menu go: Filter > Blur > Gaussian Blur > 3.5 pixels
Step 3
In the menu go: Image > Ajust > Levels

| Grab those sliders at the far ends and bring them close together, until you have a nice smooth edge on the circle. |
Step 4
 On the channels window, click the "Load Channel as Selection" button.
 Now, in the layers window create a new LAYER. Fill the selection
 (Alt+Backspace) with the color you want your tasty burger, delete the normal burger layer and you're done.
Use these new found skills to create a tasty milk-shake. Read More......
Screen Blending Mode
Tips |
Photoshop has many different ways of blending layers. Different blending modes determine how the pixels on one layer effect the pixels on other layers beneath it.

A screened black layer can be used to add lens flares and other bright things to a picture with the option to remove, filter or fade them.
For Example
I've found a picture and created a new new layer above it. Then filled the layer with black and added a lens flare.
 |  |
 |  |
 Now adding any filters to the lens flare layer will only effect the lens flare. There is now also the option later on to delete the lens flare layer or change it, offering more flexibility to your photoshop files.
Conclusion
Different blending modes offer a different effect. Use the one which stimulates your optic nerves in the best way. Read More......
Speed Up Your Photoshop Workflow
Tips |
If you’re a designer, the quality of your work must be paired with a reasonable amount of time for its completion. Working under tight deadlines and the competition on the market are just a few factors that should convince you that speed is important. And then, if you can do the same work in less time, it means you can use the gained time more effectively: for planning, for self-promotion or even for some fun!
Here are a few useful tips that you can use to speed up your Photoshop workflow:

1. Use Shortcuts
The best and easiest thing you can do to work faster is to use as many shortcuts as possible. You probably are familiar with Ctrl + S and Ctrl + Z, Ctrl + C and Ctrl + V, but you could do so much more! You can use shortcuts for all the menu commands and for all the tools, and more. Whenever a menu command doesn’t have a shortcut assigned to it, you can define one with Edit > Keyboard Shortcuts (Alt + Shift + Ctrl + K, to be true to our statements).

Above: I have set my own keyboard shortcuts for the Shadow/Highlights and the Exposure command under Image > Adjustments. Also, I have reassigned the CTRL + P command from printing (which I rarely do, since I design mostly for the web) to the Photo Filter adjustment, which I use a lot more often.
Some of the best time-saving tools are those for navigation inside your document:
- Hold down the Spacebar key to make the hand tool temporarily active and drag into your document;
- Use Ctrl + Spacebar + Click anywhere in your document where you want to zoom in;
- Add Alt to the previous shortcut (Ctrl + Alt + Spacebar + Click) to zoom out.
You can use these in the middle of painting, selecting, erasing, anything except for typing (true for most shortcuts), and once you release the spacebar key you are back to your previous tool.
My most used tool shortcuts (I can tell these by how faded the paint is on these much abused keys on my keyboard!)
- V – the move tool (remember it by the resemblance of the letter V with the arrow)
- C – the crop tool
- B - the brush tool
- P – the pen tool
- S – the stamp tool
- G – the gradient tool
Easy to remember, aren’t they?
Photoshop has a series of other shortcuts that aren’t related to a tool or a menu command, which means you can’t really read them in a tool tip. Here are some of my favorites:
- Alt + click and drag to duplicate an object and position it in a different location (to simply duplicate a layer, hit Ctrl + J)
- Ctrl + T for the transform controls. Then you can right click to have access to all the command from under Edit > Transform, including the very useful flip horizontal/vertical. To freely transform your object, Ctrl + click and drag on any corner of the transform controls (watch for the cursor to change from black to white before dragging).
- Ctrl + Alt + Shift + E: this works when you have selected the top most (visible) layer in the Layers palette, and it places a snapshot of your image on a separate layer at the top (it’s like saving a flat version of your comp and bringing it back into the comp as a layer).

For a comprehensive list of very cool and useful shortcut tricks, read this article at Web Design Wall.
2. Reuse your settings
When working with images of the same kind (as it happens often when retouching or preparing images for web), it’s very likely that you’ll need to use the same filter or adjustment with the same or close to same parameters. Then why start from the default values when you can fine tune from the previous settings?
How? Easily: use the Alt key in combination with any shortcut for adjustments or for filters. For instance, if your most recently used filter was Gaussian Blur, you can hit Ctrl + Alt + F to bring up the Gaussian Blur dialog with the setting you last used already filled in. Or, for Hue/Saturation, for instance, just hit Ctrl + Alt + U if you need to make similar adjustments with those used last time you applied Hue/Saturation.
Don’t have a shortcut for the adjustment you want to reuse? Click on the adjustment in the menu and press Alt while it’s opening (you might need a little exercise to “catch” it – if you press Alt before you click the menu option, you will close the menu).

And of course, you can always save presets for adjustments you need to apply to multiple images.
3. Use actions
Writing actions is easier than it sounds! It’s basically just recording the steps you are taking to complete a certain task in Photoshop, in order to reuse it afterwards with a simple click (or shortcut). A very simple and effective example: you’ve laid 20 web pages for a client, and you need to send them for review. Your layouts are in PSD format (because you’ll need to be able to make changes to them), but you need them all in jpeg format, so you can make a multi-page PDF file. You can open the files one by one and save them jpegs (sounds like fun, huh?), or you can open them all in Photoshop (don’t minimize them) and do this for one of them:

In you Actions palette, click the Create new action button at the bottom of the palette. Fill in the name and, if you wish, a shortcut combination. Then click Record. You will notice a red icon at the bottom of the Actions palette (it show that everything you do from this moment on in Photoshop is being recorded). Therefore, chose one of your files and save it as a jpeg. Then close the original PSD, without saving it. Back to the Actions palette, hit the square icon to stop recording. With your action selected, hit the play button for each of the remaining files and watch them disappear one by one! 30 seconds later, your jpegs are ready.
Note: you won’t be able to reuse this action, unless you want to save the files in the same folder as the one used for this action.
You can also find on the web ready-to-use actions that you can use to speed up your work. We have offered one in our Download gallery. It’s an action that I use all the time when I cut out objects for a comp because it saves me a great deal of time.
You can also run actions directly from Bridge, on a large number of images. Select your images and then choose: Tools > Photoshop > Batch. A great tool for running complex actions. Choose the action you want to run and go make yourself a cup of coffee. When you’re back, the job is done.
4. Use presets
There are numerous Photoshop presets available for free on the web and using them can prove to be a great time saver. From brushes to styles, from patterns to duotones and everything in between, these have been made available so you don’t have to start reinventing the wheel. Like glossy buttons? It can take you some time to build one up from scratch with layer effects if you haven’t done it before. If the timer is running, you might want to choose one that has already been created, and maybe tweak it until it meets your design’s needs.

DezinerFolio offers beautiful web 2.0 styles for Photoshop. Ardis Creative has started to offer resources of this kind too in the Download section. It’s not much, but it will grow with time. You can find dozens of wonderful free brushes at Brusheezy. Do yourself a favor and organize a resource database that you can turn to in times of need! Or at least bookmark these resource places and others alike.
5. Save room for changes
You certainly don’t want to start over with your design every time your boss or your client is asking you to change something… When you’re expecting changes, make a habit from working in a non-destructive manner with your layers/objects. Use adjustment layers instead of applying Hue/Saturation or Curves or anything alike directly on your image. Use the clone tool and the heal tool in a new layer on top of the one you need corrected (make sure to select Sample All layers or Current & Below in the tool’s preferences). And, if you have CS3, use smart filters.

6. Organize your Layers palette
When you’re working with very complex images, and especially when you know that others might need to work on the same file, you need to organize your layers so everything appears in a logical manner and everything is easy to find. Start with naming your layers. Names like Layer 0, Layer 39 and Layer 158 don’t say much about what’s on that layer. Organize your layers in folders. Color-code your folders for even easier identification. Lock the layers or folders that you don’t want to accidentally modify.
Note: when working with a complex image, it helps turning the Auto-Select feature of the Move tool ON, so you can click on an image and instantly identify the layer it sits on.

10 tips & tricks to make your work easier in Photoshop
Tips | Wednesday, September 26, 2007
Learn how to optimize your work in photoshop with this tutorial
I will start with my first Photoshop tutorial, ok it's not really a tutorial just some tips, general things that I found to be very useful when working in Photoshop. Even if you are an expert I think you will find some of this stuff usefull:
* Right after you installed Photoshop onto your computer, go to Edit > Preferences > General (CTRL+K shortcut) and start customizing the program according to your needs. For example I always choose Zoom with Scroll Wheel from the General (CTRL+1) section then I go to the Plug-Ins & Scratch Disks (CTRL+7) section where I will choose my first and second Scratch Disk; usually I will not choose the first Scratch Disk to be the one that has the system (I use Windows) installed on. Then I will go to the Memory & Image Cache (CTRL+8) section where I will set the Cache Levels to 8 (maximum possible) and the RAM to 55-65% to be Maximum Used by Photoshop (remember that changes will take effect the next time you start Photoshop).
* An easier way to switch between the different hidden tools is to use the keyboard shortcut along with the Shift key.
* Pressing the ALT key when you are using the Polygonal Lasso Tool will allow you use the Lasso Tool and inverse; you can combine these two in order to make a better and efficient selection. I reccomand the use of the Polygonal Lasso Tool (combined with a 300-400% zoom) when you are making a complicated selection (like when you are trying to extract an object from it's background).
* Pressing the ALT key when you are using the Dodge Tool will allow you to use the Burn tool and inverse.
* Pressing the ALT key when you are using the Blur Tool will allow you to use the Sharpen tool and inverse.
* Pressing the ALT key when you click with the Text Tool will bring you a dialog box where you will be able to choose the Paragraph text size.
* Pressing the Space key at any time will let you use the Hand Tool. Pressing the Space key combined with CTRL key at any time will let you use the Zoom Tool (the zoom in option, for the zoom out option also use the ALT key, so it's CTRL+ALT+SPACE for zoom out).
* Pressing the ALT key when you are using the Move Tool will allow you to duplicate a layer or a selected portion from a layer (if you have a selection made)
* Pressing the ALT key when you are using the Ellipse Tool, Rectangle Tool, Rounded Rectangle Tool or Custom Shape Tool to draw the shape from the centre.
Pressing the Space key when you are using one of the marquee tools or shape tools will allow you to move the selection or the shape while you are drawing it.


